Popcorn ceilings, with their textured look, were once a popular design choice for homes in the mid-20th century. Originally favored for their ability to mask imperfections and absorb sound, these ceilings have now become an eyesore for many homeowners. Whether you’re aiming for a sleeker, more modern aesthetic or worried about the potential presence of asbestos, removing a popcorn ceiling can dramatically enhance the look of your home.
While the task may seem daunting at first, with the right tools, preparation, and a clear step-by-step plan, it’s doable. Let’s dive into the detailed guide on how to remove a popcorn ceiling in seven straightforward steps.
You may also like this: Clever Window Treatment Ideas Under $50
How to Remove a Popcorn Ceiling?
Here are some simple steps to remove your popcorn ceiling:
Step 1: Understand Why You’re Removing the Popcorn Ceiling
Before starting, it’s important to consider why you’re removing the popcorn ceiling. Is it for cosmetic reasons, or do you suspect there’s asbestos lurking in the material? Popcorn ceilings applied before the 1980s often contain asbestos, a hazardous material when disturbed. While updating your ceiling improves your home’s visual appeal, it can also increase its resale value and make it safer. Understanding your goals can help you determine whether to do the job yourself or hire a professional.
Step 2: Safety First – Test for Asbestos
Safety is paramount when dealing with older homes. If your house was built before 1980, there’s a chance your popcorn ceiling contains asbestos. To ensure your safety:
- Collect a sample of the ceiling material following safety protocols. Wear gloves and a mask to avoid inhaling particles.
- Send the sample to a certified laboratory for testing.
- If asbestos is present, it’s best to call in professionals who specialize in asbestos removal. Do not attempt to scrape the ceiling yourself, as this could release hazardous fibers into the air.
If your ceiling is asbestos-free, you’re ready to move on to the next step.
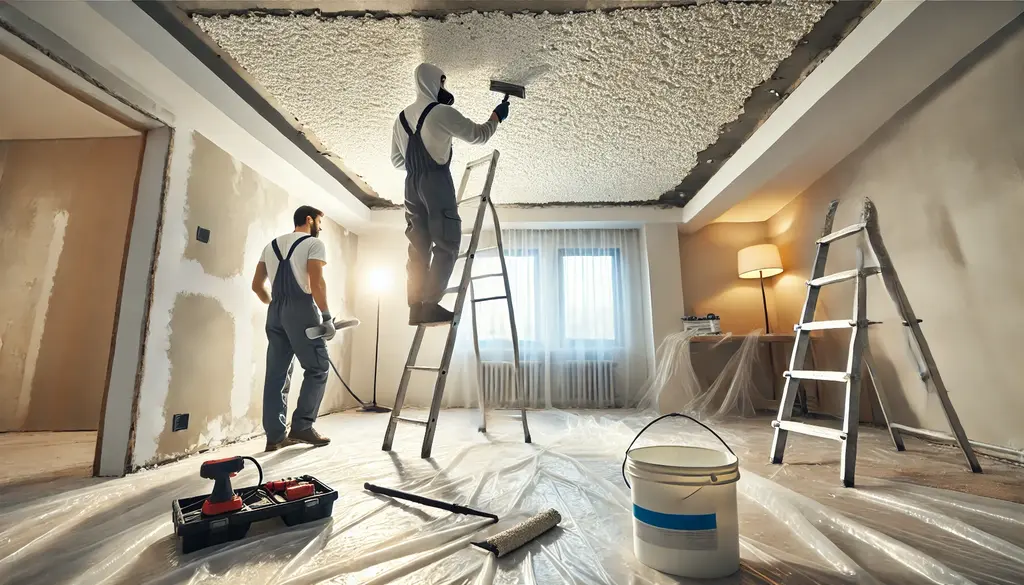
Step 3: Prepare the Room
Removing a popcorn ceiling is a messy job, so preparation is key. Start by clearing the room of all furniture, fixtures, and decor. If there are items you can’t move, cover them with plastic sheeting to protect them from dust and debris.
Next, cover the floors and walls with drop cloths or plastic sheeting, taping the edges securely to prevent damage. Turn off the power to the room and remove or cover light fixtures and ceiling fans. This preparation ensures the cleanup process will be easier and minimizes the risk of damage to your belongings.
Step 4: Gather the Necessary Tools and Materials
Having the right tools on hand will make the job much smoother. For this project, you’ll need:
- A ladder
- A garden sprayer or spray bottle
- A wide drywall taping knife or putty knife
- Plastic sheeting and painter’s tape
- Sandpaper or a sanding pole
- Joint compound (for repairs)
- Primer and ceiling paint
- Protective gear: gloves, safety goggles, and an N95 mask
These tools will ensure you can safely and efficiently tackle the task ahead.
Step 5: Start Scraping
The actual removal process begins with wetting the ceiling. Use a garden sprayer filled with water to lightly mist a small section of the ceiling. Allow the water to soak in for about 10-15 minutes. This softens the texture, making it easier to scrape off.
Once the ceiling is damp, use your drywall knife or putty knife to gently scrape the texture off. Hold the knife at a slight angle to avoid gouging the drywall underneath. Work in small sections to maintain control and ensure even removal. If the texture doesn’t come off easily, apply more water and wait a few minutes before trying again.
Be patient during this step. It’s better to take your time than to rush and risk damaging the drywall.
Step 6: Repair Any Imperfections
After you’ve removed all the popcorn texture, inspect the ceiling for any gouges or imperfections left behind. It’s common to find minor damage during the scraping process.
To repair these areas, apply a thin layer of joint compound with a putty knife, smoothing it out evenly. Allow it to dry completely, then sand the surface until it’s smooth. This step ensures your ceiling will have a polished, professional appearance once painted.
Step 7: Prime and Paint the Ceiling
With the ceiling scraped and repaired, it’s time to prime and paint. Start by applying a high-quality primer to seal the surface and create a uniform base for the paint. Once the primer is dry, apply your chosen ceiling paint using a roller or paint sprayer for an even finish.
If you’re aiming for a completely modern look, consider using a flat, matte paint to minimize imperfections and enhance the ceiling’s sleek appearance.
Alternative Options to Scraping
If the idea of scraping doesn’t appeal to you, there are alternative methods to consider. Covering the popcorn ceiling with drywall or wood paneling can achieve the same modern look without the mess of scraping. Faux-tin tiles are another stylish option that can be installed directly over the existing texture.
Final Cleanup and Finishing Touches
Once your ceiling is complete, carefully remove the protective coverings and clean the room thoroughly. Dispose of debris properly, especially if your ceiling contains hazardous materials.
Reinstall light fixtures and furniture, and step back to admire your refreshed space. The effort you’ve put in will undoubtedly pay off with a brighter, more contemporary room.
Conclusion
Removing a popcorn ceiling is a rewarding DIY project that can dramatically improve your home’s look and value. While the process requires careful preparation and attention to detail, following these seven steps ensures a safe and effective transformation. Whether you choose to scrape, cover, or call in the pros, your updated ceiling will be a source of pride and satisfaction for years to come.