
When most people hear “spray foam,” they think of wall insulation, not rooftops. But what if I told you that spray foam roofing has been quietly protecting commercial buildings since the 1970s — and doing it better than many of the more traditional systems people tend to trust?
In an era where energy efficiency and durability matter more than ever, spray foam roofing (SPF) is stepping into the spotlight. It’s not just a clever roofing trick — it’s a high-performance system that seals, insulates, and strengthens your building in one seamless move. And we’re not talking short-term gains. A well-installed SPF roof can last 30 to 40 years, which is no small feat in a market where many systems need replacing every 15 to 20.
SPF boasts the highest R-value per inch of any roofing insulation, which translates to real savings on heating and cooling — up to 30% in some buildings, according to the U.S. Department of Energy. That’s not just good for your wallet. It’s good for your building’s carbon footprint too.
So if you’re looking for a roofing system that does more than just “cover the top,” this guide will walk you through what spray foam roofing really is, how it works, what it costs, and why — with the right care — it might just be the last roof your building ever needs.
Read More: How TPO Roofing Can Improve the Longevity of Your Roof
What Exactly Is Spray Foam Roofing?
At first glance, spray foam roofing might sound like something out of a science lab — but it’s far from experimental. This system has been quietly proving itself for decades. It all starts with two liquid ingredients: one called isocyanate and the other a polyol. When sprayed together under heat and pressure, they react instantly, puffing up into a thick, foam-like layer that sticks right to the roof surface and hardens in place.
Even though spray polyurethane foam (or SPF) has been around since the 1940s, most people didn’t start using it for roofs until the late 1970s. Once it entered the building and construction world, folks quickly noticed something important: this stuff was fantastic at holding in heat during the winter and keeping buildings cool in the summer. And that meant lower energy bills.
Nowadays, spray foam roofing comes in two main types: open-cell and closed-cell. Closed-cell foam is the go-to choice for roofing — it’s tougher, more water-resistant, and ideal for withstanding the elements on commercial buildings. Open-cell foam is more about indoor comfort — it’s softer, lighter, and great for insulation and sound control.
So while it may not be the flashiest roofing solution out there, spray foam roofing does a lot of heavy lifting behind the scenes — protecting, insulating, and sealing your roof in one efficient sweep.
The Basics of Spray Foam Roofing
Unlike traditional roofing materials that are rolled out or nailed down, spray foam roofing is made right on your rooftop, in real time. It starts with two liquid components — commonly referred to as Part A and Part B. These materials are kept in separate containers until it’s go-time.
Once the job begins, both parts are heated and pressurized, then sent through a set of hoses into a mixing gun. The temperature usually hits between 115°F and 130°F — warm enough to trigger a chemical reaction the moment the liquids combine. As soon as the mixture hits the roof, it expands and solidifies, turning into a thick, durable foam layer that adheres directly to the surface.
What you’re left with is a roof that’s seamless, watertight, and lightweight — but don’t let the weight fool you. This system is built to last.
One of the biggest reasons building owners choose spray foam is its insulating power. Spray foam delivers the highest R-value per inch of any commercial roofing option, which means it keeps your building cooler in the summer and warmer in the winter — all while helping to cut down on energy costs.
But strength also matters — and in this system, it comes down to foam density. Think of it like the backbone of the roof. If you’ve ever walked across a flimsy deck, you know the feeling of each step giving a little too much. Now imagine one built with solid, thick planks. That’s the difference density makes.
During installation, we aim for the foam to set between 2.7 and 3.0 psi — the sweet spot that gives it just the right mix of strength and flexibility. If it’s any softer than 2.5 psi, it may not hold up under foot traffic or equipment, and over time you could end up with low spots or leaks.
Why UV Protection Is Non-Negotiable
Here’s something many folks don’t realize: spray foam on its own doesn’t handle sunlight very well. It seals out water and insulates like a champ, but prolonged sun exposure will slowly wear it down — kind of like how unprotected skin burns and peels after too much time in the sun.
That’s why every spray foam roof needs a UV-resistant topcoat. We typically use materials like silicone or acrylic to protect the foam from sunlight. It’s the roofing equivalent of sunscreen. With a proper coating, your foam layer stays protected for 10 to 20 years, depending on how thick the coat is and the climate in your area.
Most roofs get at least 20 mils of coating, but in sunnier or more extreme environments, we recommend going up to 30 or even 40 mils. That small upgrade can make a huge difference when it comes to how long your roof stays in good shape.
The Pros of Spray Foam Roofing
Imagine if your roof could do more than just keep the rain out. What if it could help cut your energy bills, strengthen your building, last for decades, and even reduce waste? That’s the story of spray foam roofing — a solution that’s as forward-thinking as it is practical.
Thermal Resistance (R-Value)
Think of spray foam as a super-efficient blanket wrapped around the top of your building. It doesn’t just sit there — it actively works to keep your indoor temperatures steady year-round. That’s because it has one of the highest R-values of any roofing material out there. R-value, simply put, is how well something holds in heat or keeps it out. And spray foam? It’s like the high-performance thermal wear of roofing — warm in winter, cool in summer, and money-saving all year long.
Strength & Durability
Now let’s talk about strength. Spray foam forms an invisible shield over your roof — strong, yet surprisingly lightweight. It bonds tightly to the surface and becomes a single, solid layer. No seams. No weak points. Even at just an inch thick, it actually improves the structural integrity of the roof beneath it. It’s like giving your building a quiet upgrade in strength — without the heavy lifting.
Longevity
Here’s where spray foam roofing really proves its value: it sticks around. A properly installed spray foam roof can last 30 to 40 years, easy — and sometimes even longer if you take care of it. Every decade or so, it just needs a fresh protective coating, kind of like giving your house a new coat of paint. That one simple update protects the foam from the sun and keeps it performing like new.
Think of it less like a one-time install and more like a long-term relationship. You don’t have to rip it out and start over every 15 years. You just refresh the surface, and your roof keeps going strong — no mess, no drama, and nowhere near the cost of a full roof replacement.
Seamless & Self-Flashing
One of the smartest things about spray foam? It fills in everything. When it’s sprayed on, it expands and molds to every little dip, curve, and edge of your roof — whether it’s flat, sloped, or cluttered with vents and pipes. The result? A completely seamless layer, with no joints, nails, or edges where water can sneak in.
We call it self-flashing, but really it just means it naturally hugs all the tricky areas that traditional materials struggle with. So instead of patching up leaks year after year, you’ve got a roof that’s already doing that work for you. Fewer leaks. Fewer headaches. Less stress.
Ease of Maintenance
If something does happen — say a branch scrapes the surface or you spot a small crack — don’t worry. You don’t need a full team of contractors. Most minor damage on a spray foam roof can be patched up quickly using a roofing-grade sealant. It’s the kind of fix that takes hours, not days.
That said, a little upkeep goes a long way. Just like you’d get your car checked before a long road trip, it’s smart to have a roofer do a quick inspection once in a while. Catching small issues early keeps things simple — and saves you from surprise repairs down the road.
Quickly Installed
Unlike traditional roofing, spray foam doesn’t require tearing off the old roof in most cases. It gets sprayed directly over what’s already there — which saves time, cuts down on noise, and keeps disruption to a minimum. If your building’s in use, spray foam installation is one of the least disruptive roofing options available.
Renewable & Sustainable
And here’s something a lot of people don’t realize — spray foam roofing is incredibly sustainable. Since it can be recoated and renewed without tearing it off, there’s almost no landfill waste involved. That’s a big deal when you consider how much debris ends up from traditional roof replacements. With spray foam, you’re protecting your building and the planet.
The Cons of Spray Foam Roofing
Application Equipment
Spray foam might seem simple once it’s down, but the equipment used to apply it is serious machinery — not something you pull off a shelf at the hardware store. A professional-grade spray foam rig can cost over $100,000, and that includes things like a compressor, generator, and trailer setup. It also needs constant maintenance to stay in top shape.
Now, you’re not footing the bill for that rig yourself — but the cost of owning and maintaining that kind of equipment gets baked into your quote. So if you’re comparing spray foam to a simpler roof coating system, expect the upfront price to be higher. That extra precision and tech? It comes at a cost.
The Upfront Cost: What to Expect
Let’s talk about the budget side of things for a moment. Spray foam roofing isn’t your bargain-bin option. In fact, compared to standard roof coatings, it does come with a higher upfront price tag. That’s because you’re getting more than just coverage — you’re investing in insulation, waterproofing, structural support, and energy savings all in one system.
On average, you’re looking at around $5 to $8 per square foot, sometimes more depending on the size of your roof and how thick the foam needs to be. It’s not the cheapest option out there, but it’s also not just another patch job. Think of it like buying a quality appliance — you pay more now, but it performs better and lasts longer.
Still, if you’re working within a tight budget, it’s something to factor in. We’ll help you weigh those costs against long-term savings so you can make the best decision for your building, not just your checkbook today.
Limited Application Window
One of the reasons spray foam sticks so well to your roof is the same reason it’s risky around cars, windows, landscaping, or nearby buildings — it wants to stick to everything. On a breezy day, even a small gust of wind can carry particles further than you’d expect.
Now, good contractors will use wind shields and avoid spraying when gusts go above 10–15 mph, but overspray is still something we plan around. If your building is near another structure or has sensitive outdoor elements, we need to take extra precautions. Otherwise, that foam could end up on things you didn’t want foamed.
UV Exposure
Here’s a crucial point: UV rays will break down spray foam over time. That’s not a maybe — it’s a guarantee if the roof isn’t maintained properly. The foam must be coated with a UV-protective topcoat and recoated every 10 to 15 years to prevent damage.
Think of it like a great car engine — powerful and reliable, but only if you keep up with oil changes. SPF is the same. Skipping maintenance means risking early failure, and most warranty claims get denied if there’s proof that upkeep was ignored.
Contractor Experience
Lastly, this isn’t a DIY-type roof or something you want just any roofer to handle. Spray foam installation requires specialized training, experience, and a deep understanding of the product chemistry. If the mix is even slightly off or applied under the wrong conditions, it can lead to blistering, cracking, or improper adhesion.
So, the quality of your roof hinges entirely on who’s doing the work. I always advise clients: don’t just go with the cheapest quote. Go with the contractor who can show certifications, real references, and a track record with SPF systems.
What Does Spray Foam Roofing Really Cost?
Let’s break down the numbers in a way that actually makes sense for you as a building owner. On average, spray foam roofing runs between $5 to $8 per square foot. That price can shift depending on a few key factors — like how thick the foam layer needs to be, how complex your roof shape is, or even how easy (or difficult) the surface is to prep.
Other things can move the needle too: where your building is located, the condition of your current roof, what kind of topcoat you want, and the warranty you’re aiming for. In short, no two spray foam jobs are priced exactly the same — but that range is a good ballpark to start from.
Now, here’s what often gets overlooked: SPF roofs pay you back. They’re known for dramatically lowering energy bills, thanks to their unbeatable insulation performance. So while the upfront investment might be a little higher than some options, the return comes faster — especially in buildings with high cooling or heating costs.
To give you a clearer picture, here’s how spray foam stacks up next to other popular commercial roofing materials:
| Roofing System | Low-End Cost | High-End Cost |
| Spray Foam (SPF) | $5/sq. ft. | $8/sq. ft. |
| Built-Up Roofing | $6/sq. ft. | $14/sq. ft. |
| EPDM | $4/sq. ft. | $10/sq. ft. |
| Metal* | $3/sq. ft. | $15/sq. ft. |
| Modified Bitumen | $5/sq. ft. | $12/sq. ft. |
| PVC | $5/sq. ft. | $12/sq. ft. |
| TPO | $4/sq. ft. | $10/sq. ft. |
| Roof Coatings (basic) | $2/sq. ft. | $5/sq. ft. |
Metal pricing can vary widely based on the type of metal and panel style.
So yes — spray foam may not be the cheapest option on the menu, but when you factor in the long-term energy savings, the lack of seams, and the extended lifespan, it’s one of the smartest investments you can make for your roof.
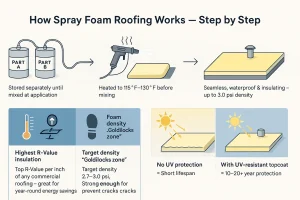
How Spray Foam Roofing Gets Done — Step by Step
If you’re thinking about going with spray foam roofing, it helps to know what actually happens up there during installation. For a mid-size commercial building — let’s say around 20,000 square feet — the whole job usually takes about two weeks, give or take. That is, of course, if the weather plays nice. Spray foam doesn’t mix well with rain, wind, or cold, so timing matters.
Here’s what the process looks like from start to finish!

1. Cleaning Things Up First
We always start with a deep clean. The roof gets a good pressure wash to blast away all the dust, leaves, grime, and anything else that could get in the way of proper adhesion. Sometimes, depending on the surface we’re dealing with, we’ll also apply a primer to help the foam grip better.
Think of it like prepping a wall before you paint — if the surface isn’t clean and ready, the finish won’t hold. This prep step sets the tone for the whole job, so we don’t cut corners here.
2. Spraying the Foam
With a clean surface ready to go, we bring out the spray gear. The spray polyurethane foam (SPF) is applied across the roof, usually starting at about one inch thick. That might not sound like much, but this material is powerful — it insulates, seals, and strengthens all at once.
Need more insulation in certain areas? We can spray it on thicker. Got dips or pooling spots where water likes to hang out? No problem. We can shape and slope the foam on-site, giving your roof better drainage where it needs it most. It’s one of the coolest things about SPF — we’re not stuck with a flat product. We shape it to your building’s exact needs.
3. Coating for UV Protection
Once the foam is in place, it’s time to protect it. We apply a UV-resistant topcoat, called an elastomeric coating. This goes on in several thin layers to make sure everything’s even, smooth, and fully covered.
Here’s the rule of thumb:
- Flat roofs usually get silicone or urethane coatings — they hold up best to standing water.
- Steep roofs? We go with acrylics, which are great for areas where water drains off quickly.
This topcoat acts like sunscreen for your roof — it keeps the foam from breaking down in the sun and helps the system last for decades.
4. Locking It All In with Granules
The final step is adding a layer of roofing granules. These are small, rough particles that we broadcast into the topcoat before it fully dries. They may not look like much, but they add grit, toughness, and UV protection — and they help keep birds or critters from pecking or digging into the surface.
And if you’re going for a long-term, no-dollar-limit warranty (which we recommend), these granules aren’t optional — they’re required by most manufacturers. So, in the end, it’s not just about finishing the job — it’s about locking in lasting protection and peace of mind.
Spray Foam Roofing Maintenance
A spray foam roof isn’t something you just install and forget. It’s a system that works hard every day to protect your building, and in return, it needs a little looking after now and then. Think of it less like a chore and more like a partnership — one that pays off when you treat it right.
Spray foam is durable and efficient, but it’s not immune to damage. A sharp piece of debris, a tool dropped by a repair tech, or a stretch of bad weather can leave a mark. These small hits might not seem like much at first, but left unchecked, they can grow into costly problems.
Maintenance Is More Like Preventative Care
Regular inspections are the best way to catch those small problems before they turn into something serious. It’s a lot like taking your car in for a tune-up or scheduling a check-up with your doctor. We usually suggest giving your roof a look in spring and fall — before the rough weather of summer or winter sets in.
And if there’s a big storm? Don’t wait. A quick post-storm walkaround could save you thousands. You’re not just keeping tabs — you’re protecting what you’ve already invested in.
Be Mindful of Foot Traffic
What many property owners don’t realize is that routine maintenance visits — especially from HVAC crews — can put the roof at risk. All it takes is one dropped tool or a sharp edge to pierce the foam and coating. It’s not intentional, but it happens.
A good practice? Ask your spray foam contractor to inspect the roof after anyone’s been up there, especially if they’re doing hands-on service work. A small check now can help you avoid a much bigger problem later.
Small Repairs vs. Bigger Fixes
If your roof does get a little damage — say a crack or hole — don’t panic. These issues are usually simple to fix with the right roof-grade sealant or mastic. The important thing is to match the product to your system. For example, if your roof is coated with silicone, only a silicone-based repair product will stick properly.
Now, if the damage is more severe — maybe the foam’s been left exposed too long or water has soaked in — the repair becomes more involved. In that case, the damaged area needs to be removed down to dry foam, then rebuilt with new material, topped with a fresh coat, and sealed with protective granules.
More effort, sure — but that’s how you get your roof back to full strength.
Recoating
Recoating your spray foam roof is like putting on sunscreen before heading back out into the sun. The foam itself stays strong, but the topcoat wears down over time. To keep the system doing its job, you’ll want to reapply that protective layer every 10 to 15 years, depending on the materials used.
Here’s what a typical recoat looks like:
- Clean the roof surface
- Fix any damaged or sun-burned foam
- Prime the area if needed
- Apply fresh layers of the same topcoat material
Done right, this process adds another decade or more to your roof’s lifespan. But it only works if the materials are high quality — and if the crew knows what they’re doing.
Conclusion
Without a doubt, spray polyurethane foam is one of the most impressive materials available in modern commercial roofing. SPF possesses many qualities that simply cannot be matched by other conventional roofing materials. With proper installation and routine maintenance, a spray foam roofing system may be the last roof you need to buy for your commercial facility.
FAQs
1. Which spray foam rig setup is best for roofing vs. interior insulation?
The right spray foam rig really depends on the job you’re doing. For roofing, you’re going to need a serious workhorse — a high-capacity rig that can keep the material hot, under pressure, and flowing evenly over large areas. Roofing foam is thicker and needs to cure fast and strong, especially out in the open where the wind and weather are working against you. So you’re looking at industrial-grade heaters, powerful compressors, and long, heated hoses that can handle distance.
Interior insulation, though? That’s a different story. Inside, you’re working with softer, open-cell foam and smaller spaces, so a compact, more portable rig usually does the trick. It’s kind of like comparing a pickup to a sports car — both are great, just for very different kinds of driving.
2. What is spray foam roofing?
Spray foam roofing is exactly what it sounds like — a protective roofing system made by spraying two liquid components directly onto your roof. When these liquids mix under heat and pressure, they instantly expand and harden into a thick, seamless layer. This layer seals cracks, adds insulation, and sticks tightly to the surface. Unlike traditional materials, it’s built on the spot, not rolled out in sheets. It works like a flexible armor, adapting to any roof shape and weather condition. With one application, you get waterproofing, thermal resistance, and durability that can last for decades when maintained.
3. Which spray foam rig setup is best for roofing vs. interior insulation?
For spray foam roofing, you’ll need a high-capacity rig capable of maintaining proper heat and pressure — because the foam has to react and cure instantly once sprayed. Roofing jobs also cover much larger surface areas and require stronger, denser foam. That’s where a professional-grade system with a powerful generator, compressor, and long hose reels comes in handy. Interior insulation, on the other hand, usually uses softer, open-cell foam and doesn’t require the same output or density. Those setups can be more compact and mobile. Bottom line: roofing rigs are the workhorses — interior rigs are more specialized for controlled, indoor conditions.
4. How to remove spray foam roofing?
Removing spray foam roofing isn’t a casual weekend task — it requires a careful process. If the foam is damaged, UV-degraded, or water-saturated, you can’t just patch over it. That section needs to be scarified — meaning, it’s ground down until you reach dry, uncontaminated foam. Once that’s done, a primer is applied, new foam is sprayed in, and the area is sealed with protective coatings and granules. It’s not something you want just anyone handling. Doing it wrong could affect the whole roof system. That’s why it’s best left to experienced contractors who know how to restore the foam without compromising the layers underneath.